Fairly recently, I started to care where my food came from, how it was treated if it was an animal, and how it was grown if it was a plant. That's when I went back to my roots, and started making certain things from scratch, and stock is one of them. It's not hard, but I quit doing it years ago for the above mentioned reasons.
Let me start by saying that I only use organic, free range chicken. I know the family who raises them for me, I know what kind of treatment they get, what they're fed, and how many times a week their giant chicken house gets moved to clean grass. They eat bugs, grass, seeds, worms, and everything that chickens are supposed to eat. They taste AMAZING, and I think that $20 a chicken is completely worth it to feel good about serving them. They also cook completely different than chicken-mill raised birds. One of the things about chicken stock, is that after you get the bird in the pot, you bring it to a rapid boil, then turn it down to low, skim the foam (which is the marrow from the bones of the chicken) that comes to a greasy gray scum on the top of the water. If you don't skim it, or continue to boil the hell out of it, then your chicken's bone marrow will fuse with the water, and you will have a nasty, murky, gray-tinged looking broth. This trick is something I JUST LEARNED! So all you beginners, don't think that you cannot learn new things, even after you've been cooking for 30 years! This is the main reason why I always hated the broth I made! It tasted okay, but it looked gross. I was mortified to learn that all it took was patience! The first thing I noticed when using these organic birds, is that there is very little junk, and I usually only skim once. I think it's because they're natural, they're not loaded full of chemicals, dyes, antibiotics, and drugs, and therefore they are very, very clean.
This is my chicken, right after I skimmed it and and added the veggies. Very clear and fragrant.
SO~~~
STEP ONE: Plan stock making for a day when you aren't rushed. Then buy a good chicken, preferably organic, free range. Your end product will be so superior, that you won't regret it. Besides, when I show you everything you can do with one stewed chicken, the results will have you sold.
STEP TWO: Invest in a good stock pan. I bought a 20 quart stock pan about 10 years ago, and it's saved my bacon on many occasions. I believe I bought it at Walgreen's or Bi-Mart. I know I didn't pay more than $12 for it. It's a necessity when making stock, and it also is awesome at Thanksgiving time when you need to make mashed potatoes by the 20# sack :>) Put your bird in the pot, and fill the pot up with COLD water until the bird is just submerged.
STEP THREE: Bring chicken to a rapid boil, then immediately reduce heat to a simmer. This means that the bubbles are just breaking the surface occasionally. This is SLOW. FYI: I put my bird in straight from the freezer, frozen solid (with that said, the farm where I buy my chickens leaves the necks attached, not wrapped in paper before they freeze them and stuff them in the cavity. They also don't put the organs in the cavity. See comments on that below.) In other words, if you're going to skip thawing it, then know what's in the cavity before you just throw it in the pan!
STEP FOUR: Skim off any foam that comes to the surface with a slotted spoon, and discard it. Then add 1 peeled carrot, one peeled onion sliced in half, 2 stalks of celery, 1T of peppercorns, 1/2 a head of garlic, one large handful of fresh parsley, several sprigs of thyme (no need to pick off leaves, just throw them in the pot), and 1 T kosher salt.
I cooked it low and slow for about 5 hours, keeping an eye on the water level, and tasting occasionally to see if it needs more salt.
When it's done, just set it on the counter for a while, maybe 15 minutes. It should still be hot, but not boiling, so you don't burn yourself when you strain it.
STEP FIVE: Pull the chicken out, and place in a bowl. It might come out in many, many pieces, and that's okay. Just pull out as much as you can with a big fork, and set aside. The rest you'll get when you strain it.
STEP SIX: Put a giant silver bowl in your sink. Get a metal strainer (I use one I bought at the Dollar Tree for $1, and it works GREAT.) Pour the broth through the strainer, until strainer is about half full. Raise the strainer up over the bowl, and allow all liquid to run into larger bowl. Put chicken and vegetables that remain in with the other bowl of chicken until you're ready to deal with that. Continue this process until all broth is strained through fine strainer.
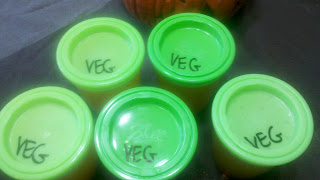
This picture shows the vegetable broth, but you get the idea with the chicken.
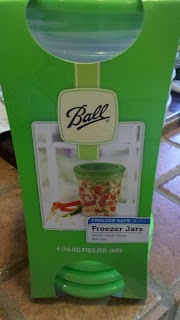
STEP SEVEN: Let the broth cool a little more, and then ladle into freezer containers. I happen to love Ball Freezer Containers. They are reusable, you can write on them, they have a screw on top (very important) and they are so easy to pull out of the freezer and thaw in the microwave when you're ready to use. They're cheap, and you can get them at Bi-Mart or Wal-Mart in the canning/freezing section.
Let the stock cool on the counter completely, then put the lids on, mark them, and throw them in the freezer. These particular freezer jars are made to stack, which really works great in any of my three freezers.
STEP EIGHT: pick the chicken off the bones. If you've done it right, the meat will just slide right off, and this won't take you very long at all. Don't forget the neck, wings and drumsticks! Most organic chickens come with the necks intact, but yours might be inside the bird. I don't use the gizzards, (my farm doesn't include them at all, which is FINE with me!). I don't like the flavor they give to the stock. But the necks, wings and drumsticks are loaded with meat. Just pick the bones out and you won't regret the extra few minutes this takes for the big handful of meat you get.
BEEF STOCK
If you're wanting to make beef stock, it's pretty much the same as above, only go to the butcher and ask for beef bones. You'll have a bit more skimming to do, depending on where you buy your beef, but the process is really similar. I usually add a little Kitchen Bouquet to my beef stock. You can get this anywhere that sells spices, and it really makes your stock a nice color.
VEGETABLE STOCK
If you want vegetable stock, there are truly no rules! I love making vegetable stock, because it is a fabulous way to get rid of old vegetables that you forgot about. Start by thinking about how things would taste together. If you wouldn't roast them all and serve them as a side dish together, don't put them together for your stock. Here's what I had today when I made stock: an onion, a few shallots, a yellow crookneck squash, a zucchini, a butternut squash, garlic, celery and a few wrinkly tomatoes. Throw all these veggies on a roasting pan (or cookie sheet) and roast at 400 degrees until they start to brown slightly and smell fragrant. You don't want them "done" but they should be starting to brown.Here's what mine looked like before I threw them in the oven. Once they start to smell good, then put them in a large kettle, and add at least 2 gallons of water. Boil them with a bay leaf, some parsley, some oregano, Kosher salt, and a T of peppercorns. I like my vegetable stock to have a golden color, and my opinion is that if you use either a butternut or some other small savory squash, or a bunch of carrots, that you'll get that same golden finish. I wouldn't use both, because I think the flavors stay more pure if you use one or the other, but it's totally a matter of taste. One vegetable family that I don't use in my stock, is anything in the cabbage family, or the beet family. I find their flavors dominate the broth and ruin the dishes where I use vegetable broth. If you're really scared about what to put in vegetable broth, go to the store and read the ingredients on a commercially prepared broth, and use what they use. Also, be very careful about things like potatoes, yams and parsnips/turnips. They can turn your broth murky.
Here's what your broth should look like after simmering for about 3 hours:
Follow the same process as above for straining, packaging and freezing. There are a couple of options for the cooked vegetables. One: you can compost them.
This is my compost bucket, and these went out onto the garden spot.
If you (like my vegetarian son, who came in and gave me a hard time about throwing all this goodness on the garden) want to be even more thrifty, then you can puree all these good vegetables up by running them through a Foley food mill. (This item is also something that I think is really necessary any kitchen, and is very inexpensive. I got mine at Bi-Mart.) The cool thing about the Foley food mill is that it removes all the skins, seeds, etc, and leaves you with a nice creamy product. You could then add some milk or broth, and have yourself a nice soup base to which you could add pretty much anything. I had other things to do today, so I sent my cooked veggies back to Mother Earth, where they will fertilize next years garden.
IN CONCLUSION
To recap: from one $20 chicken and a bunch of vegetables that I had sitting around on my counter, here's what I got:
One giant bowl of chicken, with which I made a dozen chicken enchiladas, with a 1/2 a gallon of leftover chicken enchilada filling for the next time I want to make them (see the bags of chicken at the bottom of the picture below.) I just labeled it, and tossed it in the freezer. I also got and additional half a quart of dark chicken meat for the next time I make chicken noodle soup, which I threw in the freezer too.
 | |
| Chicken Enchiladas, top and cheese enchiladas below |
And the BROTH!!:
 |
| There's my additional chicken, below the chicken broth! |
 |
| Veggie Broth! |
One last bit of advice, especially for my young married readers. If you only buy one cookbook this year, invest in "The Art of Simple Food" by Alice Waters. It's full of very easy, basic items, that will save you money for the rest of your life, if you learn to master these techniques when you're first starting out. I cannot say enough about nice things about Alice. When you get some time, Google her, and you'll be amazed by all the good things she does with her life. In this day and age of health problems and disease, what we eat is, in my opinion, the difference between life and death. It DOES make a difference where it comes from, and how it's prepared! Bon Appetit!


